Phlebology
INSTRUCTIONS FOR USE
SET FOR VENOUS INSUFFICIENCY TREATMENT, FLEBOGRIF
1. DEVICE DESCRIPTION
The set for venous insufficiency treatment Flebogrif consists of several components: catheter, needle, guidewire, introducer sheath, dilator, three-way stopcock and syringes (Fig. 1.). The catheter is equipped with a cutting elements consisting of five retractable, branching arms arranged circumferentially designed to scratch the inner wall of the vein.
-

Fig. 1. Components of the Set for venous insufficiency treatment Flebogrif
- Flebogrif catheter 6 F
- Needle 18 G
- J-type guidewire 0.035”
- a. Introducer sheath 6 F, b. Dilator
- Three-way stopcock
- Luer-lock syringe 5 ml 2 pcs
-

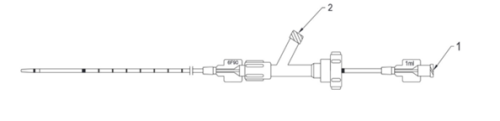
Fig. 2. Flebogrif catheter
- Cutting elements
- Inner shaft
- Outer sheath
- Soft tip
- Length markers
- Size information
- Clamping knob (Y connector)
- Inner shaft hub with the dead space information
- Sclerosant injection port (female luer-lock connector)
- Flushing port (female luer-lock connector)
L – Effective (usable) length
The catheter consists of two coaxially cooperating parts:
- internal - designed to be a lumen for the guidewire and to deliver the foamed sclerosant. The distal part includes of a cutting elements and atraumatic tip. The proximal part consists of a female luer-lock hub informing about the dead space volume of the catheter and a marker indicating the opening / closing of the cutting elements;
- external - with length markers every 1 cm (starting at 10 cm from the distal end).
The cutting elements are retracted by sliding the outer part over the inner part. Turning the n on the Y connector allows the cutting elements to be locked in the open position.
Table 1. Device parameters
Catheter diameter
6 F (2.08 mm)
Catheter length
60 cm or 90 cm
Catheter dead space volume
0.8 ml for 60 cm catheter;
1 ml for 90 cm catheter
Needle size
18 G
Needle length
7 cm
Guidewire diameter
0.035’’
Guidewire length
150 cm for 60 cm catheter;
180 cm for 90 cm catheter
Guidewire coating
PTFE (polutetrafluoroethylene)
Introducer sheath with dilator diameter
6 F (minimum ID 2.18 mm)
Syringe volume
5 ml
Syringe connector type
luer-lock
2. PRODUCT RANGE
The Flebogrif is available in 60 cm and 90 cm length versions.
3. INTENDED PURPOSE / INDICATIONS
The Set for Venous Insufficiency treatment, Flebogrif is intended for mechanochemical ablation of lower extremity superficial truncal veins.
The use of the Flebogrif is usually contraindicated in the following cases:
- active thrombosis of deep veins and their occlusion;
- ,pregnant women;
- significant lower limb ischemia;
- severe lymphedema (grade 2 or 3);
- coagulation disorders;
- allergy or hypersensitivity to a sclerosing agent and/or device materials (polyamide, polyethylene, stainless steel);
- contraindications to intravascular use of sclerosing agent foam due to other conditions.
3.2 POTENTIAL ADVERSE EVENTS
Adverse events that may be associated with the use of this device include (in alphabetical order), but are not limited to:
- allergy or hypersensitivity to device materials or a sclerosing agent;
- bleeding;
- complications resulting from the use of sclerosing agent;
- deep venous thrombosis;
- embolism;
- hematoma;
- hyperpigmentation;
- induration along the course of the treated vein;
- pain;
- perforation of the vessel;
- prolonged pain;
- saphenous nerve neuralgia;
- skin necrosis;
- superficial phlebitis;
- wound infection.
Any serious incident that has occurred in relation to the device should be reported to the manufacturer at reklamacje@balton.pl and the competent authority of the country in which the user and/or patient is established.
3.3 INTENDED USER PROFILE
Intended users of the device are only physicians adequately trained in endovenous procedures.
4. WARNINGS
- This device is designed for single use in a single patient only. Do not resterilize or reuse. Reuse or resterilization may compromise the structural integrity of the device and/or lead to device failure which, in turn, may result in patient injury, illness or death. Reuse or resterilization may also create a risk of contamination of the product and cause patient infection, including the transmission of infectious disease(s)
- Contamination of the product may lead to injury, illness or death of the patient.
- Do not use if the package is opened or damaged.
- Do not use after the expiration date given on the package label.
- Do not use if labeling is incomplete or illegible.
- Do not withdraw the guidewire against the needle bevel - it may damage or shear off the tip of the guidewire.
- Do not inject the sclerosing agent through the flushing port (Fig. 2. point 10. – Flushing port (female luer-lock connector)
5. PRECAUTIONS
- Perform ultrasound examination prior to the procedure.
- Any movements of the Flebogrif should take place over the guidewire.
- Always confirm the correct positioning of Flebogrif catheter under ultrasound guidance.
- Close the cutting elements prior to removing the Flebogrif catheter from the patient.
- This device is intended to be used in the great saphena vein and small saphena vein.
- Confirm the right position of the Flebogrif catheter distal section in the superficial vein and deep vein junction (2 cm before the junction) under ultrasound.
- In case of veins of a diameter larger than 10÷12 mm, consider double scratching of the inner vein wall (first pass over the guidewire – scratching only; the foam injecting during the second scratch).
- Evaluate the patient according to The Venous Thromboembolism Scale.
- Do not use excessive force while introducing, manipulating and removing the device. If resistance is felt, check the possible cause of resistance before deciding to continue the procedure.
- The patient should be given all information about the procedure and the correct conduct during and after the procedure.
6. HOW SUPPLIED
6.1. CONTENT OF THE PACKAGING
One (1) set, on a container in the pouch, packed with Instructions for Use in a unit box.
6.2. STERILITY
This device is supplied sterilized with ethylene oxide gas on a container in a pouch. Only the content of the pouch should be considered sterile. The device is only sterile if this packaging is not opened or damaged.
7. HANDLING AND STORAGE
Store at room temperature in a dry place, in a unit box, as supplied.
Do not expose to temperatures outside the range: 10 ºC ÷ 30 ºC.
8. DISPOSAL INSTRUCTIONS
The used device shall be treated as medical waste. After use, dispose the device and packaging in accordance with healthcare facilities, administrative and/or local government policy.
9. WARRANTY
If a delivered device is damaged or has any other defects, please inform the manufacturer and keep the device in its original packaging.
10. OPERATIONAL INSTRUCTIONS
Balton sp. z o.o. shall not be liable for any direct, incidental or consequential damages resulting from the misuse of this product.
10.1 REQUIRED DEVICES AND SUBSTANCES
AMOUNT
DEVICE / SUBSTANCE
as needed
Sterile, normal saline
as needed
Sclerosing agent
as needed
Scalpel
10.2 PREPARATION
- Check the primary packaging (pouch) for possible damage and expiry date.
If there is a suspicion that sterility may be compromised and/or the expiry date has been exceeded, it must not be used.
- Open the pouch and open the container.
- Check if the set components are not bent, kinked or damaged.
If there is a suspicion that the device is damaged, it must not be used.
- Check the patency and track the path of the superficial vein selected for ablation, using the Duplex Doppler ultrasound probe, with a particular focus on superficial vein and deep vein junction.
- Determine the lowest point of incompetent vein in which the Flebogrif catheter will be introduced.
- Determine the site in which the Flebogrif catheter will be introduced to the vein, distally from the segment with identified insufficiency of venous valves, and in the case of whole vein insufficiency, maximally peripherally, keeping in mind the necessity of sufficient vein visibility in ultrasound at the determined puncture site.
Additionally, it is helpful to identify the level of great side branches and direct perforators’ origin.
- Lay the patient in the supine position for ablation of the saphenous vein or in the prone position for ablation of the peroneal vein.
- Disinfect the patient’s skin and cover with a sterile drape.
- Remove elements of the set from the plastic container.
- Flush the needle with normal saline solution and remove the needle’s protector.
- Flush the guidewire in the hoop with normal saline solution.
- Remove the protective cap from the distal tip of the guidewire.
- Slightly, slide the guidewire out of the hoop.
- Flush the dilator and the introducer’s sheath with normal saline solution.
- Insert the dilator into the introducer sheath through hemostatic valve and snap into place.
The dilator must be snapped into place in the hemostatic valve to avoid damaging of the vessel.
- Remove the catheter from the hoop and flush both its ports with normal saline solution (Fig. 4.).
1. Sclerosant injecting port (female luer-lock connector)
2. Flushing port (femail luer-lock connector)
Fig. 4. Ports to be flushed
10.3 PROCEDURE
Perform ultrasound examination prior to the procedure.
- Anesthetize the skin in the selected site of puncture.
- Puncture the vein with an 18 G needle under ultrasound guidance.
Puncture with an 18 G needle should always be performed under ultrasound guidance.
- Straighten the guidewire tip and insert the guidewire to the needle.
- Remove the needle.
- Insert the guidewire to the superficial and deep vein junction (Fig. 5.).
Do not insert the guidewire into the deep vein to minimize the possible risk of thrombotic complications.
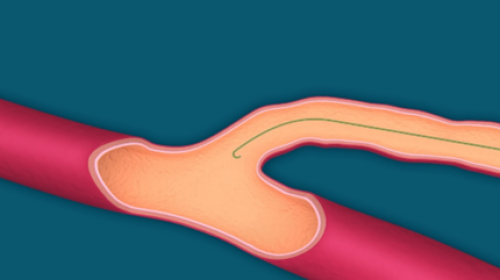
Fig. 5. Guidewire introducing
- Put the sheath with a dilator on the guidewire.
- Introduce the sheath and dilator assembly over the guidewire to the punctured vein.
Before introducing the sheath with dilator, you can make a small skin incision with a scalpel, which makes the sheath introduction easier.
- Withdraw the dilator from the sheath.
- Introduce Flebogrif catheter through the sheath, over the guidewire across the entire length of the ablated vein, placing the tip 2 cm below the superficial and deep vein junction (Fig. 6.).
Always insert the Flebogrif catheter over the guidewire.
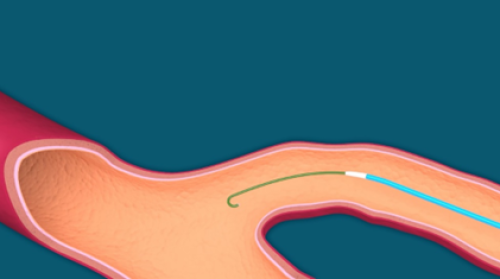
Fig. 6. Introducing the catheter over the guidewire
- Confirm the correct position of the Flebogrif catheter (2 cm below the junction of the superficial vein and the deep vein) under ultrasound guidance.
In case the position of Flebogrif catheter is to be changed, make sure the cutting elements are closed. Always change the position using the guidewire.
- Remove the guidewire.
- Open the clamping knob of the Y connector (counterclockwise) (Fig. 7.).

Fig. 7. Opening of the hemostatic valve
- Immobilize the hub (Fig. 2. point 8. - Inner shaft hub with the dead space information.
- Using your other hand, move the outer sheath with Y connector over the inner shaft all the way towards the inner shaft hub (Fig. 8a.). Cutting elements are open (Fig. 8b.).
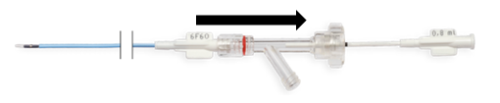
Fig. 8a. Moving the Y connector
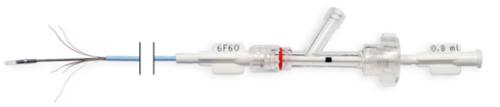
Fig. 8b. Opening of the cutting elements
At this point, the cutting elements are open and pressed against the vein wall.
- Tighten the clamping knob of the Y connector (clockwise) (Fig. 9.).
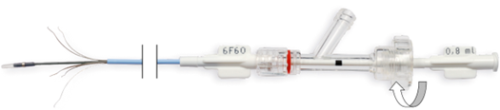
Fig. 9. Tightening the clamping knob of the Y connector
- Read the Instructions for the use of the sclerosing agent.
The dose of a sclerosing agent should be determined in accordance with the recommendations of its manufacturer.
Prepare the foam immediately before injecting. Pay attention to the foam stability time according to the sclerosant’s Instructions for use.
The ratio of air or CO2 to sclerosing agent should be 4:1 (4 units of air or CO2 to 1 unit of sclerosing agent).
- Prepare the foam:
- Aspirate 1 ml of sclerosing agent to one syringe and 4 ml of air or CO2 to another.
- Connect two syringes with a three-way stopcock (Fig. 10.).
- Move the mixture of gas and sclerosing agent back and forth between both syringes, alternatively depressing their pistons, until foam forms.
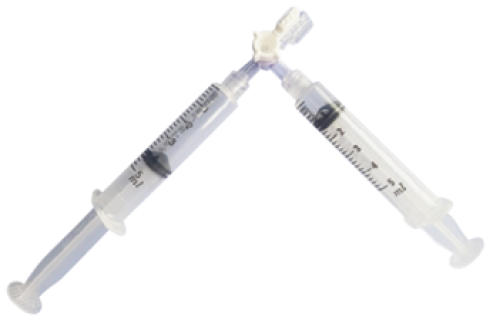
Fig. 10. Syringes connected with a three-way stopcock
- Connect the syringe with a prepared dose of foamed sclerosing agent to the Flebogrif hub (Fig. 2. point 9. - Sclerosant injection port (female luer-lock connector).
Do not inject the sclerosing agent through the flushing port (Fig. 2 point 10. – Flushing port (female luer-lock connector).
- Fill the lumen of the Flebogrif catheter with the sclerosing agent.
The dead space volume is marked on the catheter hub – 0.8 ml for 60 cm long version and 1.0 ml for 90 cm one (Fig. 11.).

Fig. 11. Dead space volume of the catheter
- Confirm the position of the cutting elements under ultrasound.
While injecting the foam, press the junction of superficial and deep vein with the ultrasound head.
- Pull the Flebogrif catheter in a steady motion, scratching the vein inner wall with the open cutting elements, simultaneously injecting the sclerosing agent (not less than 1 ml for every 5 cm of the vein).
This process should be continued along the entire length of the ablated vein, until the last 10 cm of the Flebogrif catheter remains in the vein.
If the ablated segment is relatively short, you can pull out the introducer sheath and continue pulling the Flebogrif catheter with open cutting elements out for approximately another 5 cm.
- Unscrew the clamping knob of the Y connector (counterclockwise).
- Fold the cutting elements by pulling the inner shaft out of the outer sheath until a black marker is visible outside the Y connector (Fig. 12.).
Do not pull the inner shaft once the black marker appears outside the Y connector.
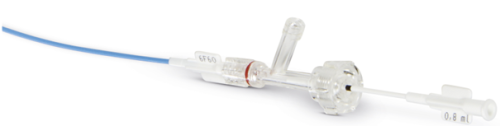
Fig. 12. Cutting elements position marker (folded elements)
- Tighten the clamping knob of the Y connector (clockwise).
- Before removing the Flebogrif catheter make sure cutting elements are fully folded and sclerosing agent injection is over.
The black marker should be visible outside the Y connector.
- Remove the Flebogrif catheter and the introducer sheath from the vein.
- After completing the procedure, apply the compression therapy with an elastic compression stocking / bandage (at 30 - 40 mmHg), for at least 2 weeks (recommended).
11. CLINICAL STUDIES
Clinical studies for this device are available on the manufacturer's website.
SYMBOLS GLOSSARY
-
CE mark
-
Medical device
-
Unique device identifier
-
Manufacturer
-
Date of manufacture
-
Use-by date
-
Catalogue number
-
Batch code
-
Consult instructions for use or consult electronic instructions for use
-
Do not use if package is damaged and consult instructions for use
-
Caution
-
Sterilized using ethylene oxide
-
Do not resterilize
-
Do not re-use
-
Single sterile barrier system
-
Single sterile barrier system with protective packaging outside
-
Non-pyrogenic
-
Keep away from sunlight
-
Fragile, handle with care
-
Temperature limit
-
Not made with natural rubber latex
-
Additional information facilitating proper use
-
n units per package
-
Keep dry
-
Recyclable packaging material
-
Outer catheter diameter
-
Catheter length
-
Introducer size
-
Guidewire compatibility
-
Needle size
-
Syringe volume
-
Swiss Authorised Representative
1. DEVICE DESCRIPTION
The set for venous insufficiency treatment Flebogrif consists of several components: catheter, needle, guidewire, introducer sheath, dilator, three-way stopcock and syringes (Fig. 1.). The catheter is equipped with a cutting elements consisting of five retractable, branching arms arranged circumferentially designed to scratch the inner wall of the vein.
-
Fig. 1. Components of the Set for venous insufficiency treatment Flebogrif
- Flebogrif catheter 6 F
- Needle 18 G
- J-type guidewire 0.035”
- a. Introducer sheath 6 F, b. Dilator
- Three-way stopcock
- Luer-lock syringe 5 ml 2 pcs
-
Fig. 2. Flebogrif catheter
- Cutting elements
- Inner shaft
- Outer sheath
- Soft tip
- Length markers
- Size information
- Clamping knob (Y connector)
- Inner shaft hub with the dead space information
- Sclerosant injection port (female luer-lock connector)
- Flushing port (female luer-lock connector)
L – Effective (usable) length
The catheter consists of two coaxially cooperating parts:
- internal - designed to be a lumen for the guidewire and to deliver the foamed sclerosant. The distal part includes of a cutting elements and atraumatic tip. The proximal part consists of a female luer-lock hub informing about the dead space volume of the catheter and a marker indicating the opening / closing of the cutting elements;
- external - with length markers every 1 cm (starting at 10 cm from the distal end).
The cutting elements are retracted by sliding the outer part over the inner part. Turning the n on the Y connector allows the cutting elements to be locked in the open position.
Table 1. Device parameters
| Catheter diameter | 6 F (2.08 mm) |
|---|---|
| Catheter length | 60 cm or 90 cm |
| Catheter dead space volume | 0.8 ml for 60 cm catheter; 1 ml for 90 cm catheter |
| Needle size | 18 G |
| Needle length | 7 cm |
| Guidewire diameter | 0.035’’ |
| Guidewire length | 150 cm for 60 cm catheter; 180 cm for 90 cm catheter |
| Guidewire coating | PTFE (polutetrafluoroethylene) |
| Introducer sheath with dilator diameter | 6 F (minimum ID 2.18 mm) |
| Syringe volume | 5 ml |
| Syringe connector type | luer-lock |
2. PRODUCT RANGE
The Flebogrif is available in 60 cm and 90 cm length versions.
3. INTENDED PURPOSE / INDICATIONS
The Set for Venous Insufficiency treatment, Flebogrif is intended for mechanochemical ablation of lower extremity superficial truncal veins.
The use of the Flebogrif is usually contraindicated in the following cases:
- active thrombosis of deep veins and their occlusion;
- ,pregnant women;
- significant lower limb ischemia;
- severe lymphedema (grade 2 or 3);
- coagulation disorders;
- allergy or hypersensitivity to a sclerosing agent and/or device materials (polyamide, polyethylene, stainless steel);
- contraindications to intravascular use of sclerosing agent foam due to other conditions.
3.2 POTENTIAL ADVERSE EVENTS
Adverse events that may be associated with the use of this device include (in alphabetical order), but are not limited to:
- allergy or hypersensitivity to device materials or a sclerosing agent;
- bleeding;
- complications resulting from the use of sclerosing agent;
- deep venous thrombosis;
- embolism;
- hematoma;
- hyperpigmentation;
- induration along the course of the treated vein;
- pain;
- perforation of the vessel;
- prolonged pain;
- saphenous nerve neuralgia;
- skin necrosis;
- superficial phlebitis;
- wound infection.
Any serious incident that has occurred in relation to the device should be reported to the manufacturer at reklamacje@balton.pl and the competent authority of the country in which the user and/or patient is established.
3.3 INTENDED USER PROFILE
Intended users of the device are only physicians adequately trained in endovenous procedures.
4. WARNINGS
- This device is designed for single use in a single patient only. Do not resterilize or reuse. Reuse or resterilization may compromise the structural integrity of the device and/or lead to device failure which, in turn, may result in patient injury, illness or death. Reuse or resterilization may also create a risk of contamination of the product and cause patient infection, including the transmission of infectious disease(s)
- Contamination of the product may lead to injury, illness or death of the patient.
- Do not use if the package is opened or damaged.
- Do not use after the expiration date given on the package label.
- Do not use if labeling is incomplete or illegible.
- Do not withdraw the guidewire against the needle bevel - it may damage or shear off the tip of the guidewire.
- Do not inject the sclerosing agent through the flushing port (Fig. 2. point 10. – Flushing port (female luer-lock connector)
5. PRECAUTIONS
- Perform ultrasound examination prior to the procedure.
- Any movements of the Flebogrif should take place over the guidewire.
- Always confirm the correct positioning of Flebogrif catheter under ultrasound guidance.
- Close the cutting elements prior to removing the Flebogrif catheter from the patient.
- This device is intended to be used in the great saphena vein and small saphena vein.
- Confirm the right position of the Flebogrif catheter distal section in the superficial vein and deep vein junction (2 cm before the junction) under ultrasound.
- In case of veins of a diameter larger than 10÷12 mm, consider double scratching of the inner vein wall (first pass over the guidewire – scratching only; the foam injecting during the second scratch).
- Evaluate the patient according to The Venous Thromboembolism Scale.
- Do not use excessive force while introducing, manipulating and removing the device. If resistance is felt, check the possible cause of resistance before deciding to continue the procedure.
- The patient should be given all information about the procedure and the correct conduct during and after the procedure.
6. HOW SUPPLIED
6.1. CONTENT OF THE PACKAGING
One (1) set, on a container in the pouch, packed with Instructions for Use in a unit box.
6.2. STERILITY
This device is supplied sterilized with ethylene oxide gas on a container in a pouch. Only the content of the pouch should be considered sterile. The device is only sterile if this packaging is not opened or damaged.
7. HANDLING AND STORAGE
Store at room temperature in a dry place, in a unit box, as supplied.
Do not expose to temperatures outside the range: 10 ºC ÷ 30 ºC.
8. DISPOSAL INSTRUCTIONS
The used device shall be treated as medical waste. After use, dispose the device and packaging in accordance with healthcare facilities, administrative and/or local government policy.
9. WARRANTY
If a delivered device is damaged or has any other defects, please inform the manufacturer and keep the device in its original packaging.
10. OPERATIONAL INSTRUCTIONS
Balton sp. z o.o. shall not be liable for any direct, incidental or consequential damages resulting from the misuse of this product.
10.1 REQUIRED DEVICES AND SUBSTANCES
| AMOUNT | DEVICE / SUBSTANCE |
|---|---|
| as needed | Sterile, normal saline |
| as needed | Sclerosing agent |
| as needed | Scalpel |
10.2 PREPARATION
- Check the primary packaging (pouch) for possible damage and expiry date.
If there is a suspicion that sterility may be compromised and/or the expiry date has been exceeded, it must not be used.
- Open the pouch and open the container.
- Check if the set components are not bent, kinked or damaged.
If there is a suspicion that the device is damaged, it must not be used.
- Check the patency and track the path of the superficial vein selected for ablation, using the Duplex Doppler ultrasound probe, with a particular focus on superficial vein and deep vein junction.
- Determine the lowest point of incompetent vein in which the Flebogrif catheter will be introduced.
- Determine the site in which the Flebogrif catheter will be introduced to the vein, distally from the segment with identified insufficiency of venous valves, and in the case of whole vein insufficiency, maximally peripherally, keeping in mind the necessity of sufficient vein visibility in ultrasound at the determined puncture site.
Additionally, it is helpful to identify the level of great side branches and direct perforators’ origin.
- Lay the patient in the supine position for ablation of the saphenous vein or in the prone position for ablation of the peroneal vein.
- Disinfect the patient’s skin and cover with a sterile drape.
- Remove elements of the set from the plastic container.
- Flush the needle with normal saline solution and remove the needle’s protector.
- Flush the guidewire in the hoop with normal saline solution.
- Remove the protective cap from the distal tip of the guidewire.
- Slightly, slide the guidewire out of the hoop.
- Flush the dilator and the introducer’s sheath with normal saline solution.
- Insert the dilator into the introducer sheath through hemostatic valve and snap into place.
The dilator must be snapped into place in the hemostatic valve to avoid damaging of the vessel.
- Remove the catheter from the hoop and flush both its ports with normal saline solution (Fig. 4.).
1. Sclerosant injecting port (female luer-lock connector)
2. Flushing port (femail luer-lock connector)
Fig. 4. Ports to be flushed
10.3 PROCEDURE
Perform ultrasound examination prior to the procedure.
- Anesthetize the skin in the selected site of puncture.
- Puncture the vein with an 18 G needle under ultrasound guidance.
Puncture with an 18 G needle should always be performed under ultrasound guidance.
- Straighten the guidewire tip and insert the guidewire to the needle.
- Remove the needle.
- Insert the guidewire to the superficial and deep vein junction (Fig. 5.).
Do not insert the guidewire into the deep vein to minimize the possible risk of thrombotic complications.
Fig. 5. Guidewire introducing
- Put the sheath with a dilator on the guidewire.
- Introduce the sheath and dilator assembly over the guidewire to the punctured vein.
Before introducing the sheath with dilator, you can make a small skin incision with a scalpel, which makes the sheath introduction easier.
- Withdraw the dilator from the sheath.
- Introduce Flebogrif catheter through the sheath, over the guidewire across the entire length of the ablated vein, placing the tip 2 cm below the superficial and deep vein junction (Fig. 6.).
Always insert the Flebogrif catheter over the guidewire.
Fig. 6. Introducing the catheter over the guidewire
- Confirm the correct position of the Flebogrif catheter (2 cm below the junction of the superficial vein and the deep vein) under ultrasound guidance.
In case the position of Flebogrif catheter is to be changed, make sure the cutting elements are closed. Always change the position using the guidewire.
- Remove the guidewire.
- Open the clamping knob of the Y connector (counterclockwise) (Fig. 7.).
Fig. 7. Opening of the hemostatic valve
- Immobilize the hub (Fig. 2. point 8. - Inner shaft hub with the dead space information.
- Using your other hand, move the outer sheath with Y connector over the inner shaft all the way towards the inner shaft hub (Fig. 8a.). Cutting elements are open (Fig. 8b.).
Fig. 8a. Moving the Y connector
Fig. 8b. Opening of the cutting elements
At this point, the cutting elements are open and pressed against the vein wall.
- Tighten the clamping knob of the Y connector (clockwise) (Fig. 9.).
Fig. 9. Tightening the clamping knob of the Y connector
- Read the Instructions for the use of the sclerosing agent.
The dose of a sclerosing agent should be determined in accordance with the recommendations of its manufacturer.
Prepare the foam immediately before injecting. Pay attention to the foam stability time according to the sclerosant’s Instructions for use.
The ratio of air or CO2 to sclerosing agent should be 4:1 (4 units of air or CO2 to 1 unit of sclerosing agent).
- Prepare the foam:
- Aspirate 1 ml of sclerosing agent to one syringe and 4 ml of air or CO2 to another.
- Connect two syringes with a three-way stopcock (Fig. 10.).
- Move the mixture of gas and sclerosing agent back and forth between both syringes, alternatively depressing their pistons, until foam forms.
Fig. 10. Syringes connected with a three-way stopcock
- Connect the syringe with a prepared dose of foamed sclerosing agent to the Flebogrif hub (Fig. 2. point 9. - Sclerosant injection port (female luer-lock connector).
Do not inject the sclerosing agent through the flushing port (Fig. 2 point 10. – Flushing port (female luer-lock connector).
- Fill the lumen of the Flebogrif catheter with the sclerosing agent.
The dead space volume is marked on the catheter hub – 0.8 ml for 60 cm long version and 1.0 ml for 90 cm one (Fig. 11.).
Fig. 11. Dead space volume of the catheter
- Confirm the position of the cutting elements under ultrasound.
While injecting the foam, press the junction of superficial and deep vein with the ultrasound head.
- Pull the Flebogrif catheter in a steady motion, scratching the vein inner wall with the open cutting elements, simultaneously injecting the sclerosing agent (not less than 1 ml for every 5 cm of the vein).
This process should be continued along the entire length of the ablated vein, until the last 10 cm of the Flebogrif catheter remains in the vein.
If the ablated segment is relatively short, you can pull out the introducer sheath and continue pulling the Flebogrif catheter with open cutting elements out for approximately another 5 cm.
- Unscrew the clamping knob of the Y connector (counterclockwise).
- Fold the cutting elements by pulling the inner shaft out of the outer sheath until a black marker is visible outside the Y connector (Fig. 12.).
Do not pull the inner shaft once the black marker appears outside the Y connector.
Fig. 12. Cutting elements position marker (folded elements)
- Tighten the clamping knob of the Y connector (clockwise).
- Before removing the Flebogrif catheter make sure cutting elements are fully folded and sclerosing agent injection is over.
The black marker should be visible outside the Y connector.
- Remove the Flebogrif catheter and the introducer sheath from the vein.
- After completing the procedure, apply the compression therapy with an elastic compression stocking / bandage (at 30 - 40 mmHg), for at least 2 weeks (recommended).
11. CLINICAL STUDIES
Clinical studies for this device are available on the manufacturer's website.
SYMBOLS GLOSSARY
-
CE mark
-
Medical device
-
Unique device identifier
-
Manufacturer
-
Date of manufacture
-
Use-by date
-
Catalogue number
-
Batch code
-
Consult instructions for use or consult electronic instructions for use
-
Do not use if package is damaged and consult instructions for use
-
Caution
-
Sterilized using ethylene oxide
-
Do not resterilize
-
Do not re-use
-
Single sterile barrier system
-
Single sterile barrier system with protective packaging outside
-
Non-pyrogenic
-
Keep away from sunlight
-
Fragile, handle with care
-
Temperature limit
-
Not made with natural rubber latex
-
Additional information facilitating proper use
-
n units per package
-
Keep dry
-
Recyclable packaging material
-
Outer catheter diameter
-
Catheter length
-
Introducer size
-
Guidewire compatibility
-
Needle size
-
Syringe volume
-
Swiss Authorised Representative